Create a Multi-Step Survey Form
A survey form serves as a valuable tool for collecting information, opinions, and feedback from website visitors. It’s important for several reasons:
Understanding User Needs
Surveys help in understanding the needs and preferences of website users, allowing businesses to tailor their products or services to better meet those needs.
Gathering Feedback
Feedback gathered through surveys can highlight both positive aspects and areas that need improvement. This feedback is crucial for making informed decisions to enhance user experience.
Improving Engagement
Engaging users with surveys can create a sense of involvement and ownership, making them feel heard and valued by the website or brand.
Data-Driven Decisions
Data collected from surveys can provide insights that aid in making data-driven decisions for the website or business, leading to more effective strategies and improvements.
For beginners in web development, creating a survey form is a great way to sharpen skills because:
Understanding HTML Structure
Creating forms involves understanding the structure and elements of HTML, such as input fields, labels, and buttons, which are fundamental to web development.
CSS Styling
Styling the form with CSS helps in understanding the visual aspects of web development, including layout, design, and responsiveness.
JavaScript Interactivity
Using JavaScript to add interactivity, such as showing/hiding form sections, allows beginners to grasp the basics of event handling and DOM manipulation.
This article will help you to make a pretty survey form using HTML, CSS, and Vanilla JavaScript. But first, take a look at the following demo video to see how the survey form appears. Watch the video here before we begin our step to step guide.
Let’s create a survey form just like the one you saw in the above video. Follow these steps closely to make it happen:
First, create a new folder on your computer. Give it a name that makes sense to you and Inside this folder, create three new files:
- “survey.html” – This file will hold all the necessary HTML code for the form.
- “survey.css” – Here, we’ll put the styles to make the form look great.
- “survey.js” – In this file, we’ll write plain JavaScript to make the form work smoothly.
Next, let’s put in the code:
COPY HTML CODE:
Copy the following provided HTML code and paste it into your “survey.html” file.
<!DOCTYPE html>
<html lang="en">
<head>
<meta charset="UTF-8">
<title>3-Step Survey Form</title>
<link rel="stylesheet" href="survey.css">
</head>
<body>
<div class="survey-container">
<form id="surveyForm" class="form-step">
<div class="step step-1">
<h2>Step 1</h2>
<label for="question1">Question 1: </label>
<input type="text" id="question1" required><br><br>
<label for="question2">Question 2: </label>
<input type="text" id="question2" required><br><br>
<label for="question3">Question 3: </label>
<input type="text" id="question3" required><br><br>
<button id="nextStep1">❯</button>
</div>
<div class="step step-2">
<h2>Step 2</h2>
<label for="question4">Question 4: </label>
<input type="text" id="question4" required><br><br>
<label for="question5">Question 5: </label>
<input type="text" id="question5" required><br><br>
<label for="question6">Question 6: </label>
<input type="text" id="question6" required><br><br>
<label for="question7">Question 7: </label>
<input type="text" id="question7" required><br><br>
<button id="prevStep2">❮</button>
<button id="nextStep2">❯</button>
</div>
<div class="step step-3">
<h2>Step 3</h2>
<label for="question8">Question 8: </label>
<input type="text" id="question8" required><br><br>
<label for="question9">Question 9: </label>
<input type="text" id="question9" required><br><br>
<label for="question10">Question 10: </label>
<input type="text" id="question10" required><br><br>
<button id="prevStep3">❮</button>
<button id="submitSurvey">Submit</button>
</div>
</form>
</div>
<script src="survey.js"></script>
</body>
</html>Here is the very brief explanation of the above HTML code:
- The HTML code sets up a basic 3-step survey form, with three sections, each section containing questions and button or arrows for navigation between steps.
- Each step is within a div with a unique class (
step-1,step-2,step-3), and the initial step (step-1) is displayed always by default. - It includes basic form elements like input fields for questions and button and right and left arrows for navigation.
COPY CSS CODE:
Take the following CSS code and put it into your “survey.css” file.
body {
  font-family: Arial, sans-serif;
}
.survey-container {
  width: 50%;
  margin: 50px auto;
  height: 300px;
  padding: 25px;
  border: 1px solid rgba(255, 255, 255, 0.25);
  border-radius: 20px;
  background-color: #004754;
  box-shadow: 2px 2px 10px 1px #92921b;
  backdrop-filter: blur(15px);
  border: 1px solid #ccc;
}
.form-step {
  text-align: center;
}
.step label {
  color: white;
}
.step input[type="text"] {
  border: none;
  width: 75%;
  height: 30px;
  color: #004754;
}
@media only screen and (max-width: 700px) {
  .step input[type="text"] {
    border: 1px solid green;
    width: 40%;
  }
}
.step {
  display: none;
}
.step h2 {
  color: white;
}
.step #nextStep1,
.step #prevStep2,
.step #nextStep2,
.step #prevStep3 {
    padding: 8px 20px;
    border: 1px solid white;
    background-color: transparent;
    color: white;
}
.step #nextStep1:hover,
.step #prevStep2:hover,
.step #nextStep2:hover,
.step #prevStep3:hover {
    padding: 10px 15px;
    border: 1px solid #92921b;
    background-color: transparent;
    color: white;
}
.step #submitSurvey {
    background-color: transparent;
    padding: 8px 30px;
    color: white;
}
.step #submitSurvey:hover {
    background-color: white;
    color: #92921b;

}
.step-1 {
  display: block;
}
Find below very short and brief explanation of the above CSS code:
The CSS code is used for styling the form, making it visually appealing and enhancing user experience. It helps in understanding how to position elements, style text, and create a layout to make the form aesthetically pleasing and user-friendly.
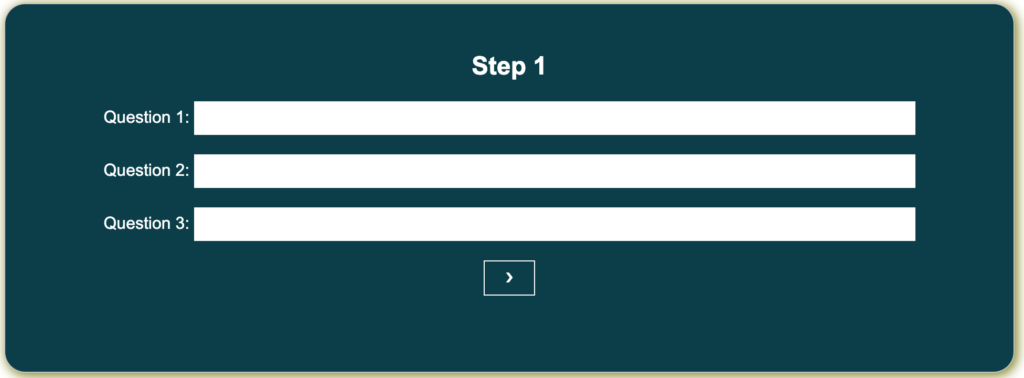
IMPORTANT: Now, open your HTML file in your web browser. You’ll see something similar to the following picture. But if you try clicking the ‘Next‘ arrow, it won’t do anything yet. That’s where JavaScript comes in.
COPY JAVASCRIPT CODE:
Copy the JavaScript code that is provided below and paste it into your “survey.js” file.
document.addEventListener("DOMContentLoaded", function() {
    const form = document.getElementById('surveyForm');
    const step1 = document.querySelector('.step-1');
    const step2 = document.querySelector('.step-2');
    const step3 = document.querySelector('.step-3');
    const nextStep1 = document.getElementById('nextStep1');
    const nextStep2 = document.getElementById('nextStep2');
    const prevStep2 = document.getElementById('prevStep2');
    const prevStep3 = document.getElementById('prevStep3');

    nextStep1.addEventListener('click', function(e) {
      e.preventDefault();
      step1.style.display = 'none';
      step2.style.display = 'block';
    });

    nextStep2.addEventListener('click', function(e) {
      e.preventDefault();
      step2.style.display = 'none';
      step3.style.display = 'block';
    });

    prevStep2.addEventListener('click', function(e) {
      e.preventDefault();
      step2.style.display = 'none';
      step1.style.display = 'block';
    });

    prevStep3.addEventListener('click', function(e) {
      e.preventDefault();
      step3.style.display = 'none';
      step2.style.display = 'block';
    });
  });
Refresh your web browser, and yes! It should work perfectly now. Congrats, you’ve just made your very own beautiful survey form. Try to personalizing it by adding more steps to make it your own.
Below is the brief explanation of the JavaScript code:
- The JavaScript code handles the functionality of the survey form.
- It uses event listeners to detect clicks on the ‘Next’ and ‘Previous’ arrows, controlling the display of form steps accordingly. Additionally, it introduces the concept of DOM manipulation that is crucial for creating responsive and interactive web pages.
- When a ‘Next’ arrow is clicked, it hides the current step and shows the next step.
- When a ‘Previous’ arrow is clicked, it hides the current step and shows the previous step, allowing navigation back and forth within the form.
CONCLUSION:
This code provides a basic structure and functionality for a multi-step survey form, allowing users to navigate through the steps, answering questions as they progress.
The provided code functions by creating a 3-step survey form with specific questions in each step. The HTML defines the structure of the form, CSS styles it for a more appealing look, and JavaScript handles the interaction by showing and hiding form steps as the user progresses.
It’s a best practice to understand these components as they form the foundation of web development. As a beginner, mastering HTML, CSS, and JavaScript is essential, and creating a multi-step form is a great exercise that covers various fundamental concepts of web development. Understanding these components will pave the way for creating more complex and interactive web applications in the future.